Somerset County drainage projects: homeowner checklist
A drainage project on your Somerset County property can begin with something that looks very small: a new downspout, a gravel swale, a patio, a shed, or a plan to redirect water away from the foundation.
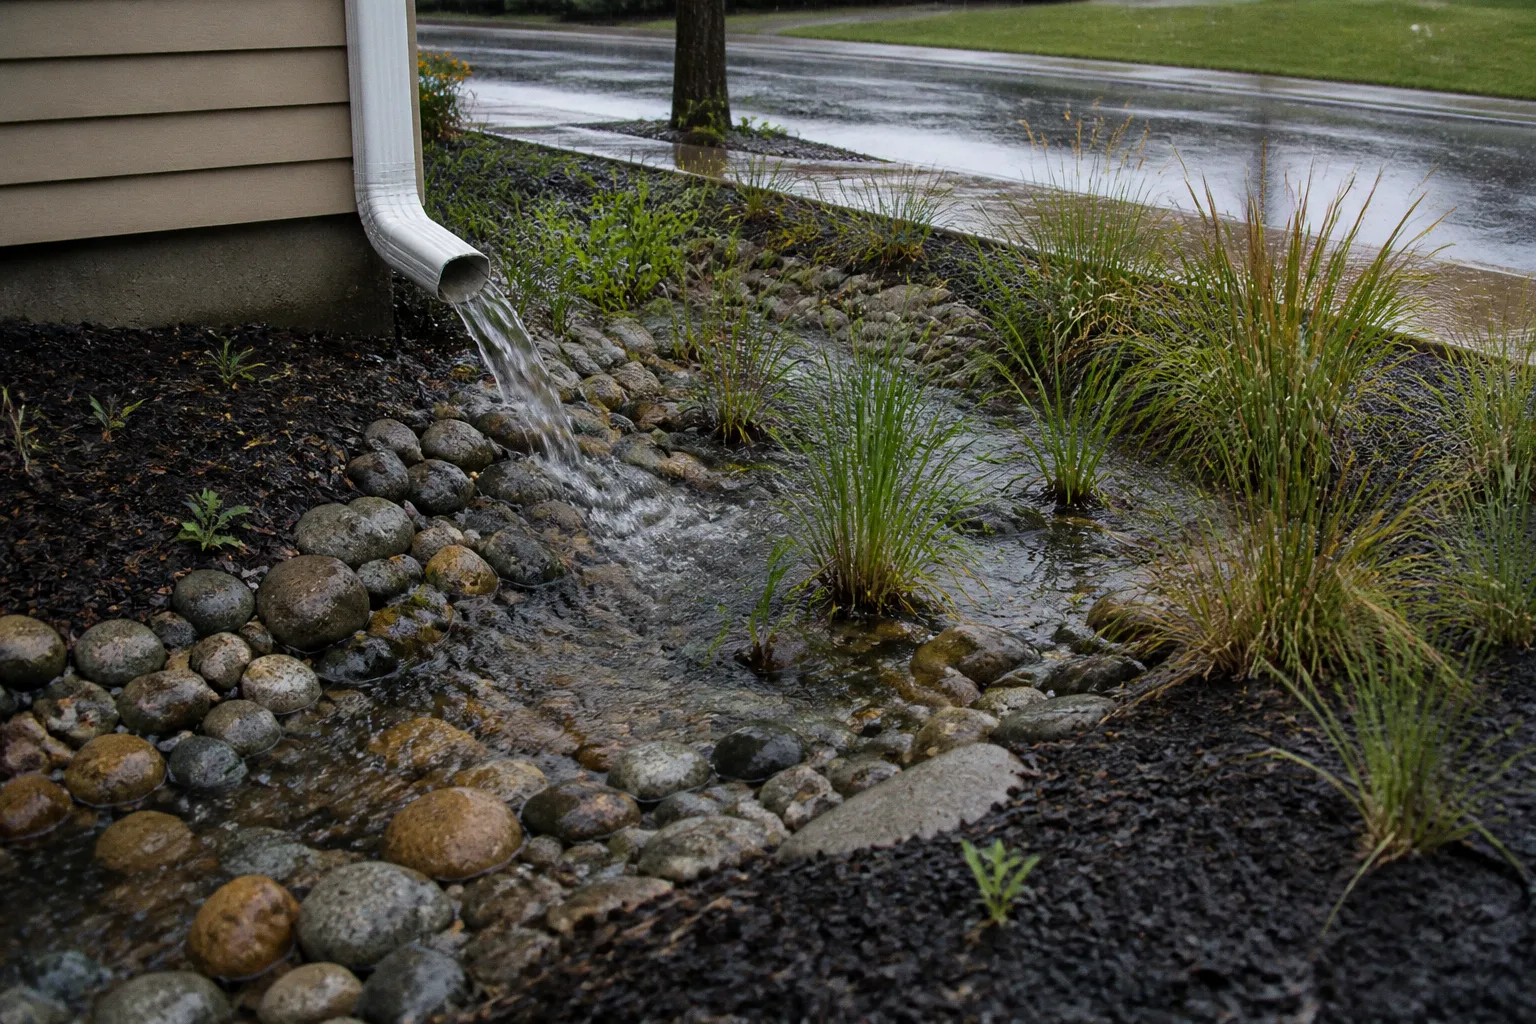
But the county’s review requirements are tied less to how simple the project feels and more to how much land will be disturbed, how much hard surface will be added, and where the runoff will go.
That is why a Somerset County residential drainage project checklist should start before anyone digs. A project may qualify for a simplified Standard Stormwater Management Plan, but only if it stays within specific limits. Once the work reaches the county’s land-disturbance or earthwork thresholds, a more formal stormwater and erosion-control review is required.
The practical question is not simply, “Can I fix the wet spot in my yard?” It is, “What will this work change about water movement on my lot, and what does that mean for our neighbors, roads, ditches, streams, and the wider community fabric?”
1. Describe the drainage problem before choosing a solution
Before selecting a pipe, swale, French drain, rain garden, or grading change, document what is happening. A useful description is more specific than “the backyard floods.”
Look at:
- Where water first appears during and after a storm.
- Whether the water comes from the roof, an uphill property, the road, a ditch, or saturated ground.
- How long the area remains wet.
- Whether runoff reaches a foundation, crawl space, septic area, driveway, neighboring lot, or public right-of-way.
- Whether soil, mulch, or gravel is washing away.
- Whether the problem is new or has existed since the property was developed.
- Whether the same location floods only during unusually intense rain or during ordinary storms.
This first step matters because a drainage fix can move a problem without solving it. A downspout extension may protect one corner of the house while sending concentrated flow toward a boundary. A shallow swale may work for a modest runoff volume but erode when it receives roof water from several structures. A buried pipe may carry water efficiently while creating an outlet that is too close to a neighboring property or too steep to remain stable.
In Somerset County, the right answer often depends on the relationship between the lot, the surrounding road drainage, nearby wetlands or waterways, the Chesapeake Bay Critical Area where applicable, and the amount of impervious surface on the property. What works on one block may be a poor fit a few hundred feet away.
Make a simple site inventory
You do not need an engineering drawing to begin gathering information. Walk the property after a substantial rain and mark the basic features on a printed parcel sketch or aerial image:
1. Roof areas and existing downspouts. Note which downspouts discharge onto soil, pavement, splash blocks, underground pipes, or directly toward a ditch.
2. Hard surfaces. Include the house, additions, sheds, decks with enclosed areas, patios, walkways, driveways, parking pads, and other surfaces that prevent rainfall from soaking into the ground.
3. Low points and flow paths. Identify where water collects and where it naturally travels.
4. Soil and vegetation. Dense grass, bare soil, compacted areas, gardens, and wooded ground do not all absorb or slow water in the same way.
5. Existing drainage features. Include swales, culverts, roadside ditches, storm drains, ponds, and outlet structures.
6. Sensitive areas. Mark wells, septic components, streams, marshes, shorelines, and places where standing water could affect access or public infrastructure.
This inventory gives you a clearer starting point when navigating the board or speaking with the county office. It also helps separate a maintenance issue from a project that changes site drainage.
The best drainage plan does not merely make water disappear from your yard; it gives runoff a stable, non-erosive path that does not create a new problem downstream.
2. Calculate the project’s regulatory thresholds
The most important numbers in Somerset County residential drainage are not mysterious, but they do require careful counting. Small work can qualify for a Standard Stormwater Management Plan when it stays within the county’s stated limits. Larger disturbance triggers formal review.
The three numbers to put on your worksheet
| Project measure | Threshold | Why it matters |
|---|---|---|
| Total site impervious cover | No more than 15% of the lot | A project may qualify for the simplified Standard Stormwater Management Plan when the total impervious cover remains within this limit |
| Land disturbed during construction | Less than 30,000 square feet | This is one condition for Standard Stormwater Plan qualification; septic construction disturbance may be subtracted if the area is revegetated |
| Land disturbance or excavation | 5,000 square feet of disturbance or 100 cubic yards of excavation | Reaching either threshold triggers mandatory stormwater and erosion-control plan approval by the County Engineer or other approving authority |
These figures describe different parts of the project, so they should not be treated as interchangeable.
Impervious cover concerns the portion of the lot covered by surfaces that do not readily absorb rainfall. A new concrete pad, roofed addition, asphalt area, or similar surface can change the runoff calculation even when the excavation itself is limited.
Disturbed area concerns the land affected by construction activity. Grading, trenching, clearing, filling, staging, and access routes may all matter, depending on how the project is carried out. The area is not limited to the footprint of the final drainage feature.
Excavation volume measures soil removed or moved. A project can involve less than 5,000 square feet of land disturbance and still reach the separate 100-cubic-yard excavation threshold.
Count the full construction footprint
One of the easiest mistakes is to measure only the finished feature. If you are installing an underground drainage line, the trench is part of the disturbed area. If machinery needs a temporary access lane, that area may also be relevant. Spoil piles, grading around an outlet, and soil exposed during construction can expand the footprint.
Phased work should not be viewed as a way around the threshold. The county’s requirements apply to cumulative disturbance across phases, so dividing one project into several smaller work orders does not erase the total area affected.
A careful preliminary estimate should include:
- The area cleared for the work.
- Trench and excavation areas.
- Grading needed to establish the drainage slope.
- Areas used for equipment access or material storage.
- Soil disturbed around inlets, outlets, basins, and swales.
- Any related patio, driveway, addition, or other construction happening at the same time.
If your estimate is close to a threshold, treat that as a reason to ask for direction before construction begins, not as an invitation to round down.
3. Determine whether a Standard Stormwater Management Plan fits
The Standard Stormwater Management Plan is intended for qualifying residential work that remains within the applicable limits. It is simpler than a full construction review, but “simplified” does not mean “unregulated.” The plan still needs to show that runoff will be handled safely and that the project complies with the county’s stormwater requirements.
For qualification, the key conditions in the available county guidance include:
- Total site impervious cover does not exceed 15% of the lot size.
- Total land disturbance remains below 30,000 square feet.
- The project meets the applicable design and drainage conditions.
- Any treatment, discharge, or erosion-control measures are properly shown.
The septic-related allowance deserves special attention. Area disturbed for septic system construction may be subtracted from the calculation when that area is revegetated. That is not the same as assuming all septic work is automatically excluded. The condition matters, and the final site treatment should support the calculation.
What to prepare before contacting the county
A useful submission or preliminary conversation will usually be easier if you have the following information organized:
1. A property sketch or plan showing the house, lot lines, existing hard surfaces, proposed work, and drainage direction.
2. A disturbance estimate that includes construction access, grading, trenches, and outlet areas.
3. Impervious-cover calculations for existing and proposed conditions.
4. Roof drainage information showing which downspouts serve which roof areas.
5. The proposed discharge point and the route water will take after it leaves the pipe or swale.
6. A description of erosion protection for exposed soil, slopes, inlets, and outlets.
7. Information about nearby sensitive features, including streams, wetlands, shorelines, septic areas, or public drainage facilities.
The goal is to make the project legible. County staff can respond more usefully when they can see what will change, how much ground will be disturbed, and where runoff will travel.
Do not wait until materials are delivered or the excavator is scheduled. If the work reaches 5,000 square feet of disturbance or involves 100 cubic yards of excavation, the county review requirement is already in play. A drainage project that begins as backyard maintenance can become a regulated construction activity once the footprint expands.
4. Design downspouts so runoff slows down instead of concentrating
Roof runoff is often the first place homeowners can make a practical improvement. A downspout that empties beside the foundation, across a walkway, or onto bare soil can create erosion and saturation even when the total roof area seems modest.
Under the standard residential design conditions described for Somerset County, rooftop downspouts should discharge and drain continuously through at least 60 feet of vegetation in a non-erosive manner to the property line. The vegetated flow path should be stable, continuous, and capable of receiving the water without turning into a channel of bare soil.
There is also a drainage-area limit: each rooftop downspout should serve no more than 500 square feet of roof drainage area unless another arrangement is permitted. When a downspout receives more than 500 square feet, additional treatment such as a rain garden, rain barrel, or another locally approved practice may be needed.
What a compliant-looking route should accomplish
A good downspout plan should answer four practical questions:
- Where does the water leave the downspout?
- How much roof area contributes to that downspout?
- How does the flow travel for the required distance?
- What prevents the outlet and the receiving ground from eroding?
A splash block alone is not a complete drainage strategy when the discharge is concentrated, the soil is bare, or the slope sends water rapidly toward a lot line. Likewise, a long discharge pipe does not automatically solve erosion if it ends at a steep drop or releases water onto compacted ground.
Vegetation is part of the system, not decoration. A healthy, continuous vegetated path slows water, protects soil, and gives rainfall more opportunity to infiltrate. Where a grassed route cannot safely handle the runoff, the design may need a different treatment practice.
When additional treatment may make sense
Rain gardens and rain barrels can be useful, but they are not interchangeable.
- A rain barrel stores a portion of roof runoff for later use, but it needs an overflow route for a full barrel and must be maintained.
- A rain garden creates a planted depression that temporarily receives and treats runoff, but its location, soil, overflow, and relationship to foundations and septic features need careful attention.
- A vegetated swale can convey water while slowing it, provided its slope, width, vegetation, and outlet are appropriate.
- A stable pipe outlet may be necessary where water must cross a slope or reach an existing ditch, but the outlet still needs erosion protection.
For what this means for your block, the central point is straightforward: a downspout should not become a private storm drain aimed at the next property.
5. Separate stormwater review from erosion and sediment control
Homeowners sometimes think of stormwater as a permanent drainage question and erosion control as a temporary construction issue. In practice, the two are connected.
During construction, bare soil can wash into roadside ditches, streams, wetlands, and neighboring yards before the permanent drainage system is finished. A project therefore needs to address both:
- How water will be managed after completion.
- How exposed soil will be protected while work is underway.
Maryland and Somerset County requirements call for mandatory stormwater and erosion-control plan approval when land disturbance reaches 5,000 square feet or more, or when excavation reaches 100 cubic yards or more. The review is not limited to large subdivisions. A residential project can reach the threshold through a combination of clearing, grading, drainage installation, driveway work, and related improvements.
Construction details that deserve attention
A workable erosion-control approach should account for:
1. The timing of soil exposure. Avoid leaving large areas bare longer than necessary.
2. Runoff entering the work zone. Water from uphill areas may need to be diverted or slowed.
3. Stockpiled soil. Spoil piles should not sit where rainfall can carry sediment into a ditch or waterway.
4. Trench restoration. Backfilled drainage lines need to be stabilized, not simply covered with loose soil.
5. Outlet protection. The discharge point may require vegetation, stone, or another approved stabilization method.
6. Final revegetation. A project is not complete when the pipe is buried; the disturbed ground needs a stable surface.
7. Connection to public drainage. Work affecting a roadside ditch, culvert, or public facility may involve additional permissions beyond the private-lot design.
A common failure is to install the permanent pipe first and assume the site will take care of itself. During the weeks before grass is established, the very feature intended to solve runoff may be surrounded by loose sediment. Planning temporary protection from the beginning is usually cleaner, safer, and easier than repairing a washed-out site later.
Reaching a threshold is not a punishment for improving your property. It is the point at which runoff from one lot can affect public drainage and neighboring land, so the project needs a shared standard.
6. Check the receiving area, not just the source of the water
A drainage design is only as good as its outlet. Moving water away from a house is helpful; moving it toward a road, septic system, wetland, stream, or neighboring yard may create a new concern.
Before finalizing the route, inspect the receiving area for:
- Existing ponding or saturated soil.
- Evidence of prior erosion.
- A steep slope or sharp drop.
- A ditch that already carries water during storms.
- Septic tanks, drain fields, wells, or utility corridors.
- Wetlands, tidal areas, streams, or shoreline features.
- Property boundaries and public rights-of-way.
- Places where winter freezing could create an unsafe surface.
In a coastal and low-lying county, drainage can be affected by more than rainfall falling directly on your roof. High groundwater, tidal conditions, storm surge, clogged ditches, undersized culverts, and intense short-duration storms can all change how quickly a site drains.
This is also where the wider Somerset MD watershed matters. Runoff leaving a residential lot does not stop being part of the watershed when it reaches the edge of the property. Sediment and nutrients carried into local waterways contribute to problems that communities address through Chesapeake Bay restoration and watershed-management efforts.
The design does not need to solve the entire county’s water system, but it should avoid worsening a known downstream problem.
7. Do not assume a property is safe because it is outside a high-risk flood zone
Flood maps are useful, but they are not a complete drainage diagnosis. FEMA research indicates that approximately 40% of National Flood Insurance Program claims originate outside designated high-risk flood zones. That figure is an important reminder for homeowners who believe a lower-risk map designation means water cannot affect their property.
A property outside a high-risk zone can still experience:
- Localized stormwater ponding.
- Poor yard grading.
- Road or ditch overflow.
- Blocked culverts.
- Groundwater saturation.
- Water entering through a crawl space or low foundation opening.
- Runoff from an uphill lot.
- Flooding caused by a storm that exceeds the assumptions used in local mapping.
When reviewing flood exposure, combine the map with observations from your own property. Look at past water marks, neighbors’ experiences, road closures, drainage ditches, and the behavior of the site during major storms. If your home is near the coast, a tidal waterway, or a low-lying drainage network, Maryland’s broader climate-adaptation and Coast Smart planning principles may also be relevant to how new construction and improvements are designed.
A drainage project should not be used to create a false sense of security. A new swale may reduce nuisance runoff without making a property flood-proof. A rain garden can manage part of the roof drainage without addressing rising groundwater. A pump can remove water temporarily while leaving the underlying vulnerability unchanged.
8. Use this sequence before construction begins
Once you have described the problem and sketched the proposed work, move through the project in a deliberate order.
Step 1: Measure the lot and existing impervious cover
Estimate the lot area and identify all existing hard surfaces. Add the proposed surface changes, not just the drainage feature. The 15% impervious-cover limit can affect whether the project fits the Standard Stormwater Management Plan pathway.
Step 2: Map the full disturbed area
Include clearing, trenching, grading, equipment access, material storage, spoil piles, drainage structures, and final restoration. Compare the total with the 30,000-square-foot Standard Plan limit and the 5,000-square-foot mandatory-review threshold.
Step 3: Estimate excavation
If the project involves substantial grading or soil removal, calculate the excavation volume. The separate 100-cubic-yard threshold can trigger review even when the disturbed surface area is smaller.
Step 4: Trace every roof discharge
For each downspout, identify the roof area it serves and the complete route of discharge. Check the 500-square-foot drainage-area condition and plan for at least 60 feet of continuous vegetated flow where the standard design applies.
Step 5: Choose treatment based on the site
Use a vegetated route where it can safely handle the runoff. Consider a rain garden, rain barrel, swale, or another approved practice where roof drainage is concentrated or the available flow path is too short. Do not select a feature solely because it is easy to install.
Step 6: Identify sensitive and public features
Mark septic systems, wells, wetlands, waterways, roadside ditches, culverts, and rights-of-way. A private drainage project may affect facilities or resources that require additional coordination.
Step 7: Contact the county before breaking ground
Bring your sketch, measurements, proposed outlet, and threshold calculations to the appropriate Somerset County reviewing authority. Ask which plan pathway applies and whether the work requires stormwater, erosion and sediment control, or other approvals. The exact review timeline and fee schedule may vary, so do not build those assumptions into your construction schedule without confirmation.
Step 8: Stabilize the site as you build
Protect exposed soil, keep sediment out of ditches and waterways, stabilize trenches and outlets, and complete revegetation rather than leaving the finished drainage system surrounded by bare ground.
Common mistakes that make a small drainage project harder
Several problems appear again and again in residential work:
- Counting only the final feature. A drainage trench is not the only disturbed area.
- Treating a downspout extension as harmless by default. Concentrated roof flow can erode soil and affect another property.
- Ignoring the 500-square-foot roof drainage limit. A single downspout may serve more roof area than the standard condition allows.
- Measuring the lot but not the hard surfaces. Impervious cover can change the applicable plan pathway.
- Assuming septic disturbance is always excluded. The allowance depends on revegetation and the applicable calculation.
- Dividing one construction job into phases to stay below a threshold. Cumulative disturbance still matters.
- Sending water into a roadside ditch without checking the connection. Public drainage features are not automatically available private outlets.
- Using flood-zone maps as the only risk tool. Local drainage failures occur outside mapped high-risk areas.
- Waiting until construction is underway to ask questions. A site that has already been cleared is more difficult to evaluate and stabilize.
- Solving the foundation problem by creating a boundary problem. Runoff should be slowed and managed on the property rather than simply exported.
The practical standard for a good Somerset County drainage project
A successful residential drainage project does three things at once: it protects the home, keeps runoff from damaging neighboring or public property, and leaves the site more stable than it was before construction.
That requires more than choosing a product from a home-improvement aisle. It means understanding the project’s disturbance area, impervious cover, excavation volume, roof drainage, outlet conditions, and relationship to the watershed. It also means recognizing when a project has moved beyond routine maintenance and into county review.
If we approach drainage as part of shared infrastructure rather than an isolated backyard inconvenience, the rules become easier to understand. The 5,000-square-foot disturbance threshold, the 100-cubic-yard excavation threshold, the 15% impervious-cover condition, and the downspout requirements are all ways of asking the same basic question: can this property absorb, slow, and safely convey the water its construction will create?
Start with that question, document the full scope of the work, and contact the county before digging. That is the most reliable first step for protecting your house and the community fabric around it.